
How to Add a Signature to WordPress Blog Posts

Have you ever wondered how bloggers add a special ‘signature’ design at the bottom of every blog post? Well I’m going to show you how to add a signature to wordpress blog posts today!
First, you’ll need to create the signature image you’d like to use. Tip: It’s best to save the image as a .png file. Here’s a few options to choose from:
- Use graphic software like Adobe Photoshop, PicMonkey.com or Canva.com
- Sign a piece of paper and scan it.
- Have a custom design created by a graphic designer like me.
Here’s a couple real life examples of custom signature designs we’ve created for clients – to match their branding:

(1) Alicia of Our Vintage Nest. (2) Martha of Martha + Jane.
How To Add a Signature to WordPress Blog Posts using “Genesis Club Lite” plugin. Note: This plugin can ONLY be used with Genesis Child Themes.
- Design your signature image.
- Login to your WordPress dashboard.
- Install and activate Genesis Club Lite plugin.
- On the left hand side, click on USERS, then edit YOUR PROFILE. This provides you with your ‘personal options’.
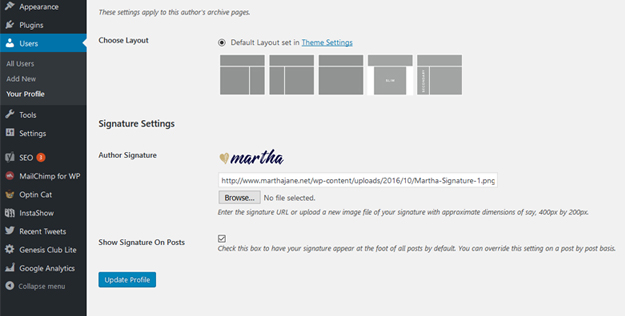
- Scroll to the bottom of your ‘personal options’ to SIGNATURE SETTINGS see image below.
- Upload your signature image file.
- Check the box after ‘show signature on posts’ seen in image below. You’re done!
OR
How To Add a Signature to WordPress Blog Posts by manually adding a signature.
If you don’t want to use a plugin, you can add a signature manually to the end of your blog posts (or about page) instead.
- Design your signature image.
- Login to your WordPress dashboard.
- Upload your signature image to your MEDIA library.
- Once you’ve written your blog post, simply insert your image into the bottom of the post. You’re done!
And, that’s it! Feel free to leave a link to your blog if you want to showcase your spectacular new signature!
Cover Image via Martha of Martha + Jane.
