Step 4: How To Set Up Hosting With Bluehost
 UPDATED: July 2021

Selecting reliable hosting will be one of the most important decisions you make. To a great extent, the functionality and performance of your blog will depend on your hosting provider. The host makes sure your blog is available 24/7 to your readers and it’s where your files are stored online.
Having the wrong web host can cause a lot of problems with your blog. Your web host is a major piece of the puzzle to maintain a successful blog, therefore, it’s important that you choose a reliable provider.
If you want an easy, reliable, here to stay, one click WordPress install option – not to mention the hosting provider trusted by top bloggers – I recommend Bluehost.
Head over to Bluehost here.
How To Set Up Hosting With Bluehost
Your first step will be to click on the GET STARTED NOW button and then select a hosting plan level. I’d suggest the BASIC PLAN. This plan is paid in one lump sum and gives you quite a bit of a discount versus paying monthly – I’m frugal, so you know this would be the one I’d choose! Note: Once your blog grows, you can easily upgrade to a larger plan!
What the heck is hosting?! Hosting is basically your little rented space on the web, allowing you to make your blog accessible to the online community. Bluehost has great rates and gives you your domain name for free if you host with them.
1. Choose a hosting plan.

2. Create (or set up) your domain name.
Once you’ve selected your plan, you’ll check to see if your domain name is available.
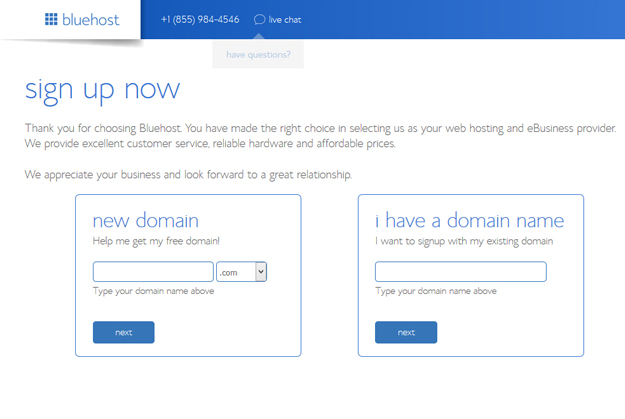
When you click the NEXT button, you’ll either see ‘not available’ or ‘congratulations’ the domain name you’ve selected is available.

3. Enter Bluehost account details.

Next, Bluehost will ask you to fill out some personal information to create your account.
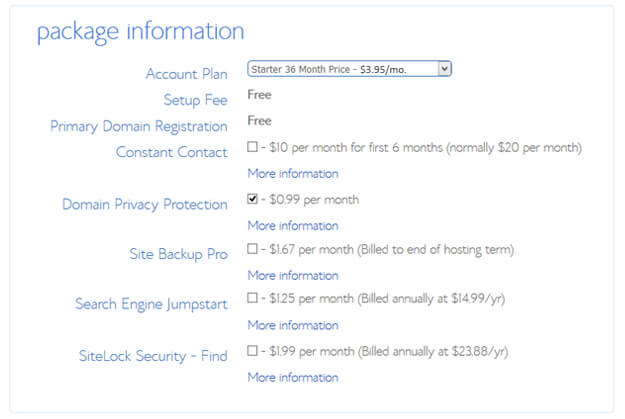
4. Confirm hosting plan details.
You’ll see the account and package information. Place your account information into the various fields. Below is an example of the package information settings most used:
5. Enter your payment details.
Pay for your hosting package:
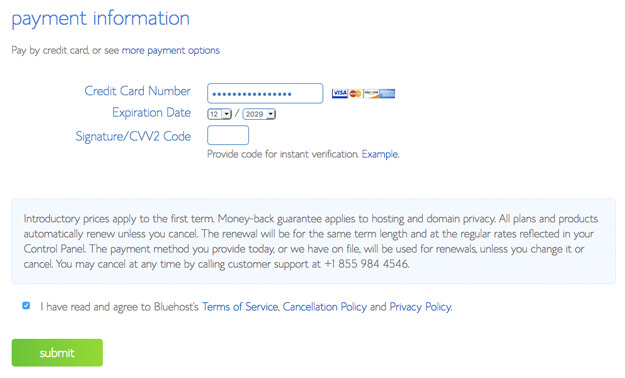
Bluehost will now go ahead and set up your new hosting plan and domain name. You will receive an email with payment confirmation as well as your new account information, including login and password details.
What’s Next?
Step 5: Install WordPress.
Disclaimer: Please note that some of the links above are affiliate links and I will earn a commission if you purchase through these links. I am recommending them because they are helpful and are businesses that I trust.


I always appreciate your thorough, simple to follow posts. Praise God for you, my blog just may survive.
Girl – it’s gonna THRIVE!!! We all start at chapter 1.
Bluehost is an amazing host! You and they make things so easy.