How To Get More Website Traffic + Optimize Your Pinterest

Did you know that Pinterest is a great way to drive traffic to your blog? If you want to know how to get more website traffic + optimize your Pinterest account, then keep reading.
I’ve broken things down into 5 easy steps on how to get more website traffic + optimize your Pinterest.
STEP 1: Create Your Account + Claim Your Website
If you don’t already have a Pinterest account, create one. Go to Pinterest.com and sign up by creating a username. My username is ‘marketingbff’ because I want to drive traffic to my business/my blog.

After creating your account, visit the settings area in the dashboard and click “Profile” and then, scroll down to CLAIM your website.

Follow the directions HERE to claim your website so that you can get proper tracking of your content.
STEP 2: Update Your Profile
Your followers need to know who you are and how to find you. First, add your name to your profile. You can even add a fun keyword after your name. For example, “Tana – Your Marketing BFF | Entrepreneur + Blogging Tips” is mine.

Make sure your profile photo is a personal photo of you (or your team). You’d think a logo would work well, but people want to see your face! It allows them to feel a personal connection to you and your brand.
The best Pinterest profile photo size is 600 x 600 pixels.
Next, add your actual bio (in the ‘about your profile’ area)… who you are, what you offer. I like to give a snippet of who I am and what I do (plus include a keyword or two in there as well).
Make sure you have a link to your website in your profile! Here’s what people see when they come to my Pinterest profile:

STEP 3: Organize Your Content + Boards
Be consistent. I use board covers, but you don’t have to. Whichever way you choose is fine, just make sure all boards are consistent. Thus, if you choose to use board covers, make sure all boards are using board covers. I also title all of my boards in lowercase with three dots after them.
Also, make sure that your boards are actually what your target market would want to see. For example, if I were planning a baby shower and wanted to pin these types of things, it would be best to have this board as a secret board – since this is not something my target market would want to see!
STEP 4: Utilize Keywords In Your Boards
Just as you would with your actual pins, it’s good to add descriptive keywords to your Pinterest boards.
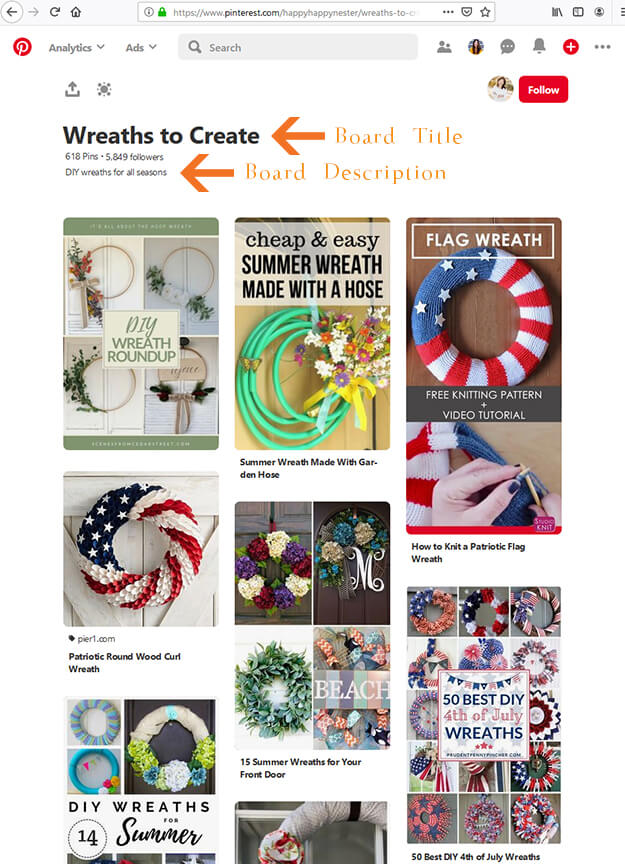
Here’s a real life example of Happy Happy Nester’s “Wreaths to Create” board. Her description is ‘DIY wreaths for all seasons’
How do you add a description and keywords to your Pinterest boards?
-Choose the board, and then click on the pencil icon to ‘edit’ it.

-Add a description and keywords.

BFF Tip: Want to find some great keywords quickly? Use the Pinterest search bar. Begin typing in a keyword and you’ll see a bunch of keywords that are searched!
STEP 5: Archive. Don’t Delete.
One of the biggest mistakes I hear people say is that it’s okay to delete Pinterest boards if you want to clean up your boards.
DO NOT DELETE YOUR PINTEREST BOARDS!!!
If you delete a Pinterest board, the followers and impressions that you’ve gained from that board will be gone forever once you delete that board.
Want to remove a board? Simply click on the pencil icon to ‘edit’ and then click ‘Archive.’ OR you can just make the board secret! Note: You can later add the board back if you need to.
Pinterest is my #3 driver of traffic to my blog and can be one of your top drivers too. Do these 5 easy steps on how to get more website traffic + optimize your Pinterest… and watch your website traffic from Pinterest increase!

Great reminders. I need to organize my boards…UGH! Where does the time in the day go! Thanks, Tana!
Everything is a work in progress! It’s like laundry – just when you think you’re caught up, there’s another load to wash. haha
Thank you for this, Tana; it is SO helpful! Do you mind sharing how you get the scrolling “featured boards” that you have? Is this a plug in? Also, the blog URL we put in “About Your Profile” won’t link~but we still need to include (even though we have live links under our profile photo?
Hope this makes sense; thank you for sharing!!!
Hi Jamie- Yep, totally makes sense. Here are the steps to obtaining scrolling featured boards on your Pinterest account: (1) Click on the … at the top right of your Pinterest account. (2) Click SETTINGS. (3) Scroll down the ‘Profile’ section and click EDIT next to ‘Featured Boards’. (4) Select up to 5 public boards you’d like to feature. (5) Click SAVE. That’s it!
Such great ideas, Tana! I can tell I’m going to keep coming back to this one lots of times! 😉 Thanks so much!
Phew!! I’m good on all of these! I do need to go in and check on my board titles and descriptions, though! A “fall cleaning” is in order!
A ‘cleaning’ is always good to do… on a regular basis! xo