How To Create Categories and Add Them to WordPress Menu Bar
 Are you using categories in your WordPress blog? Categories provide a helpful way to group related posts together, and to quickly tell readers what a post is about.
Adding a category to your menu bar allows readers to easily find your content and navigate to a related group of blog posts – those subject matters that they love, all in one place.
But before you can assign categories to your blog posts and add them to your menu bar, you have to create them first.
Go to your WordPress Dashboard > Posts > Categories. You’ll see the following settings panel.

1 ) Name. The title of your category. For example, I have a category name ‘eat & sip’ and another one called ‘marketing’.
2 ) Slug. This will generate automatically by the system based on the name of the category once you hit the “ADD NEW CATEGORY” button.
3 ) Parent Category. Select the parent category for the category. The parent category will display all of its child categories blog posts on the same page. Most of the time I select NONE.
4 ) Description. Explain what the category is about. By default, it will be hidden from the page. I don’t fill this in because my name says it all and it’s really not necessary.
Fill out the form for a category you’d like to have and click on the ADD NEW CATEGORY BUTTON. Repeat for each new category you’d like to add.
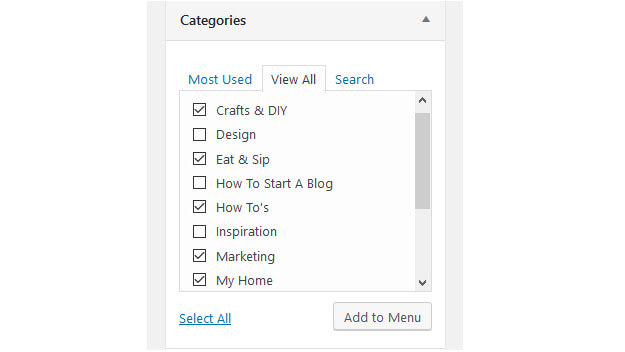
Now go back to your Dashboard > Appearance > Menus. Expand the categories panel on the left hand side and you’ll see all of the categories you have created.

Select the categories that you’d like to display on the menu and click the ADD TO MENU button.
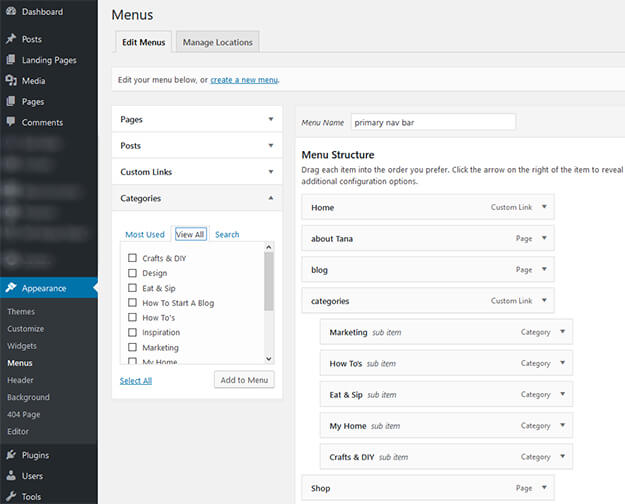
When you click on the ADD TO MENU button, the category or categories will automatically drop to the bottom of your menu.
Placing Categories into your dropdown location.
Drag each item into the order and/or location you prefer on your menu bar.

If you are adding categories into a dropdown location (like I have on my blog + image above), you will want to drag each of the items so that they are indented under the main menu item. For example, I’m going to place the ‘marketing, how to’s, eat & sip, my home and crafts & diy categories’ to my main menu CATEGORIES.
Note: When you place your categories as a dropdown, ‘sub item’ is automatically assigned to it.
Click the SAVE MENU button (on the upper right hand side) and your categories are now LIVE and visible to your readers.
If you put your mouse over my CATEGORIES menu bar, you’ll see a live example of my categories added to my wordpress menu bar!
Want to learn more about how to create dropdown menus? Go HERE.


Tana, you have been helpful in so many ways. Love everything you share….THANK YOU!! xo
Thanks Laila! This is one of those questions that I get asked a lot – so it’s best to write a blog post to send people to. haha. xo
Thanks for the detailed steps. I am learning so much from you! XOXO
So glad Marissa! Just know that blogging is a marathon, not a sprint… and you will continually be learning and evolving! Love reading your blog posts. xo
Thank you for sharing this! Now I just need to get the Genesis Framework in place so I can make these changes! You are so helpful Tana!
Hi Abbie! You can do these things without having the Genesis Framework… but the Genesis Framework is pretty cool! xo
Thanks for the tutorial! I love that you have these floating around in your blog so that we can come and help ourself anytime we need to do something that we don’t do all the time. Because we don’t do these things all the time, we tend to forget the small details and your tutorials are mini-refresher courses! Thanks, Tana!
So welcome! Heck, I need reminders myself… we all do. xo