How To take a Light, Bright and Airy Photo
 If you’ve followed Your Marketing BFF for longer than a week, you can probably tell that I love light, bright and airy photos! It’s my thing. It’s part of my brand. And it’s just me.
A question I get asked a lot is ‘how to take a light, bright and airy photo’. In the past I’ve shared how I do this using my iPhone and Snapseed (a FREE photo editing app that is very user friendly). And another time I shared how my friend, Kelley Nan does it using PicMonkey.
Today, I’m going to share with you how I take a light, bright and airy photo using my manual settings on my Canon 5D Mark III and my favorite lens (50 mm). I’m going to keep this VERY BASIC!
Let me start off by saying… I’m not a professional photographer – well my college course in photography might qualify me a little – but it’s not what I do for a living, it’s more of a hobby.
I like to use the manual setting because it allows me to bring in lots of extra light, to give me that ‘bright and airy’ look to my photos.
FIRST: I always start with setting the Aperture. This is how much light enters through the lens, which is measured in f-stops.
The lower the f-stop, the more light is coming through the lens. My sweet spot tends to be 2.0, but it can vary between 1.4 and 4.0. Not only does a lower f-stop allow for more light to come in, but it also gives you that blurry background (aka bokah) behind your subject = depth of field. A large depth of field means that your entire image will be in focus (example: f/16). I tend to gravitate towards a blurred background, so an f/2 works well here.
SECOND: I adjust the Shutter speed. This is the length of time that the shutter is open and thus affects the amount of light in your photos.
When you look on your view finder or camera screen, you’ll see a scale of numbers -3, -2, -1, 0, +1, +2, +3. Overexposed photos are very light (above the ‘0’) and underexposed photos are very dark (below the ‘0’). Most professionals will say to keep the exposure at ‘0’, but I like to have my exposure a bit more lighter/exposed so I set mine in between 0 and +2.
THIRD: I check my ISO. This is how sensitive the camera is to light. If it’s really bright out (which is most of the time here in AZ) I’ll leave my ISO nice and low at 100 or 200, when I’m in a darker space I’ll bring the ISO up higher.
All that being said…
Sunlight is, hands down, my favorite light source!
This means that I shoot my photos in a space that is well lit. Since I live in AZ and we are certainly no strangers to sunny days, I tend to shoot a lot outside under our covered patio or in our garage with the garage door open.
If I’m shooting something inside the house, I shoot near a window with indirect, diffused light coming in. (By diffused, I mean light that is not brightly shining in through the window).
I end up doing very little editing!
Once I’ve captured my photos in my camera, I tend to load them into my computer. Then using Adobe Lightroom or Photoshop I’ll give them a little ‘extra wow’ factor.
 But, if I want something really quick, I’ll upload to my phone and use the Snapseed app (you can read more about how I use Snapseed here).
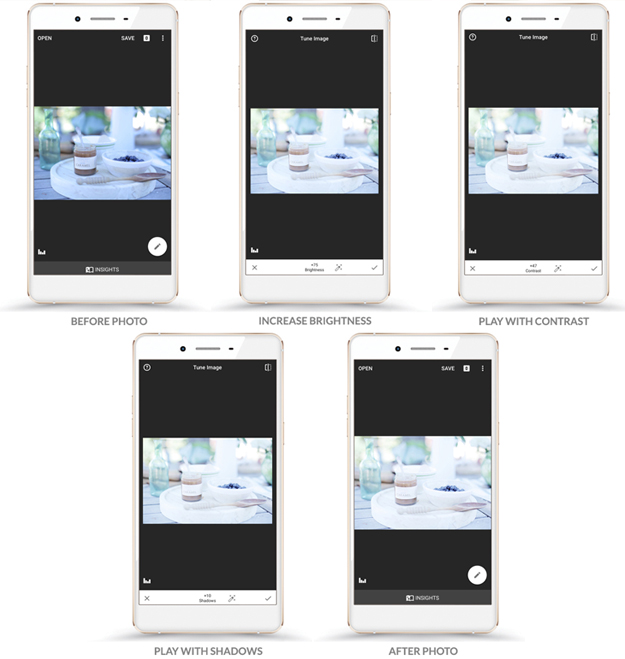
Here are the key things I tend to adjust:
- Brighten the picture. It depends on the light of the original photo, but I tend to still lighten it a bit more.
- Play with the contrast until you get the desired color you’re looking for.
- Play with the shadows. I like minimal to no shadows, so I play with the shadow intensity until I get the look I want.
The demo above shows a before and after using Adobe Lightroom on my computer. And here’s a before and after picture using the Snapseed app.
 See how easy it is to transform an ‘okay’ photo and make it light, bright and airy!


This is so helpful and beautiful, Tana! ???
Thanks Summer! I can see you doing this f’sure.
You always break it down so well Tana! Love the prom pic! Adorable 😉
Yes, Lexie’s last prom. One kiddo left for high school dances – we’ll see how those turn out! haha
Great tutorial, Tana! You make it sound so simple and achievable!
How far we have come, huh?! Been loving your recipe photos…
Thank you, I love your tutorials.
Awww thx Debra! And I love your loyalty and dedication to this blog. xo
Love this!!!! I have snapseed, now I will start using it
You go girl! Can’t wait to see what you come up with. LOVE my snapseed.
Oh now I need snapseed Tana!! You always make everything sound so easy…such a great tutorial! Thank you:))
Icing on the cake… Snapseed is a free app!
Always love your tips Tana!! Thanks for sharing! Xoxo
Thanks Amy! Love watching your blog adventures. xo
Thanks for all the info! You’re always so helpful. xo
You are so welcome! Thx for reading and sharing your thoughts. xo